Azure Databricks Hands-on
This tutorial will explain what is Databricks and give you the main steps to get started on Azure


TL;DR;
The first part will be relative to the setup of the environment. The second part will be the steps to get a working notebook that gets data from an Azure blob storage. The last part will give you some basic queries to check that everything is working properly.
Introduction
What is Spark?
Apache Spark is an open-source cluster-computing framework. Spark is a scalable, massively parallel, in-memory execution environment for running analytics applications.
What is Databricks?
Databricks is a San Francisco based company that provides the eponym product Databriks. Databricks delivers a unified analytics platform powered by Apache Spark. Learn more about Databricks solution here.
Databricks removes all the hardness and complexity to get a Spark cluster. They provide a seamless, zero-management, Spark experience thanks to the integration with major cloud provider including Amazon AWS and Microsoft Azure.
You can get working fully managed cluster in 5 minutes tops on Azure.
Likewise, in you are familiar with Jupyter or Zeppelin notebooks, you will feel at home with Databricks notebooks as this is the central part for developing.
Python and Scala languages are supported, and notebook can mix both.
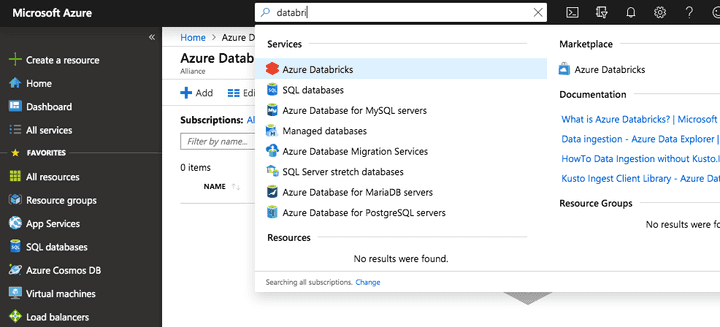
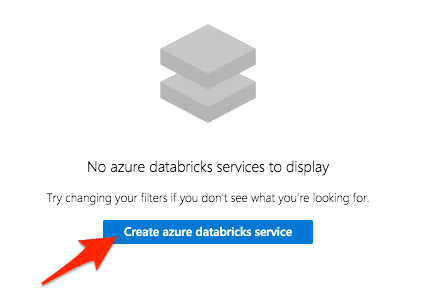
Create your first cluster on Microsoft Azure
Important note: you need a Databricks Premium version if you want to deal with ADSL Gen2 storage accounts with credential passthrough.
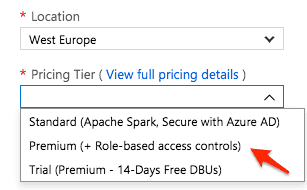
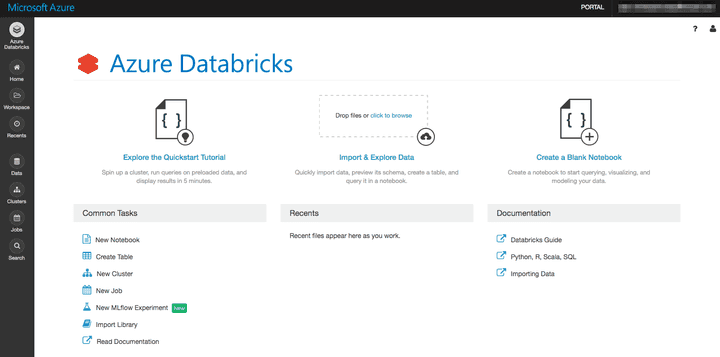
You should now be in the Databricks workspace:
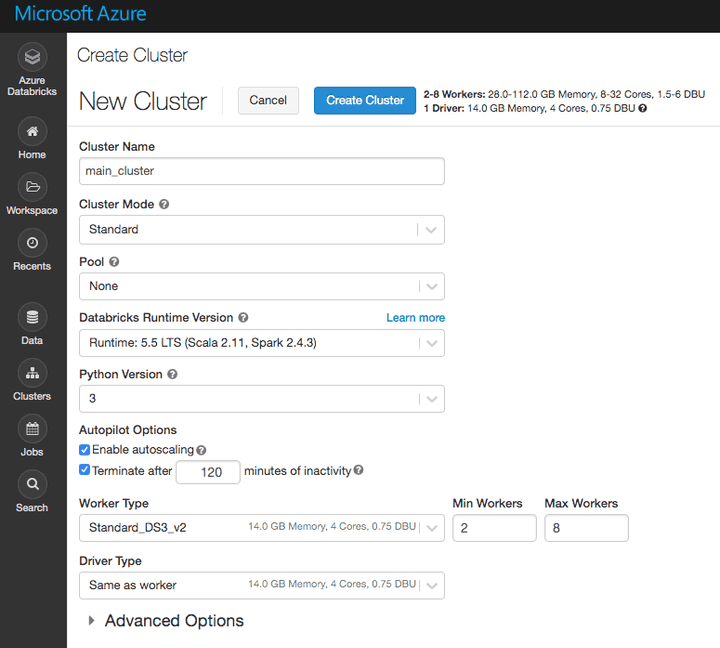
The next step is to create a cluster that will execute the source code present in your notebooks.
Important notes:
- A standard cluster is a cluster that is designed to be used by a single person whereas a high concurrency cluster is designed to be shared by dozens of users. Preemption and fault isolation are used for sharing the cluster, which is not possible in Scala.
- If you want to write your code in Scala in addition to Python, you need to choose “Standard” cluster instead of High Concurrency cluster. >
You can adjust the cluster size later according to the price you are willing to pay. Notice that the cluster will be shut down automatically after a period of inactivity.
Open the Advanced Options and enable the credential passthrough if you have a Premium account and ADSL Gen2 storage.:
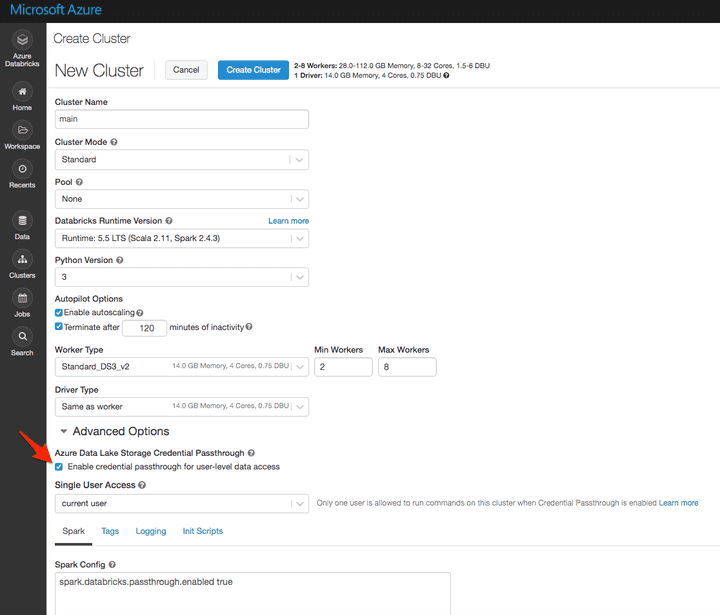
The creation of the cluster can take several minutes. During the meanwhile, we can create our first notebook and attach it to this cluster.
Before going further, let’s dig into some glossary.
Some Spark glossary
Spark context
Spark Context is an object that tells Spark how and where to access a cluster. In a Databricks notebook, the Spark Context is already defined as a global variable sc.
Spark session
Spark Session is the entry point for reading data and execute SQL queries over data and getting the results. Technically speaking, Spark session is the entry point for SQLContext and HiveContext to use the DataFrame API.
Spark Session can also be used to set runtime configuration options.
In a Databricks notebook, the Spark session is already defined as a global variable spark.
- In python:
# Databricks Notebooks have some Apache Spark variables already defined.
# SparkContext: sc
# SQLContext/HiveContext: sqlContext
# SparkSession (Spark 2.x): spark

print("Spark version", sc.version, spark.sparkContext.version, spark.version)
print("Python version", sc.pythonVer)

# Spark version 2.3.0 2.3.0 2.3.0
# Python version 3.5- In Scala:
// Databricks Notebooks have some Apache Spark variables already defined.
// SparkContext: sc
// SQLContext/HiveContext: sqlContext
// SparkSession (Spark 2.x): spark

println("Spark version " + sc.version)
println("Spark version " + spark.version)
println("Spark version " + spark.sparkContext.version)
println("Scala version " + scala.util.Properties.versionString)

// Spark version 2.3.0
// Spark version 2.3.0
// Spark version 2.3.0
// Scala version version 2.11.8
RDD: Resilient Distributed Dataset (RDD)
An RDD is an immutable distributed collection of data partitioned across nodes in your cluster with a low-level API. It is schema-less and used for low-level transformation and actions.
Dataframe (DF)
A DataFrame is a distributed collection of rows under named columns. It is the same as a table in a relational database. It is closed to Pandas DataFrames. A DataFrame has the ability to handle petabytes of data and is built on top of RDDs. A DataFrame is mapped to a relational schema.
Dataset
A Dataset is a strongly-typed DataFrame. A DataFrame as an alias for a collection of generic objects Dataset[Row], where a Row is a generic untyped JVM object.
DataFrame and Dataset are now merged in an unified APIs in Spark 2.0. Learn more on the differences between DF, Dataset, and RDD with this link from Databricks blog.
Python or Scala notebooks?
This is the main question every new developer on Spark asks. If you are familiar with Python (Python is the language of choice for data scientist), you can stick to Python as you can do almost everything in Python.
However, Scala is the native language for Spark. Because Spark is itself written in Scala so you will find 80% of the examples, libraries, and discussions in StackOverflow in Scala.
The good news is that you don’t have to choose in Databricks notebook as you can mix both languages so as it is simpler to develop with Python, I do recommend using Python first and use Scala when Python is not enough.
The Python library to deals with Spark is named PySpark.
Create your first python notebook
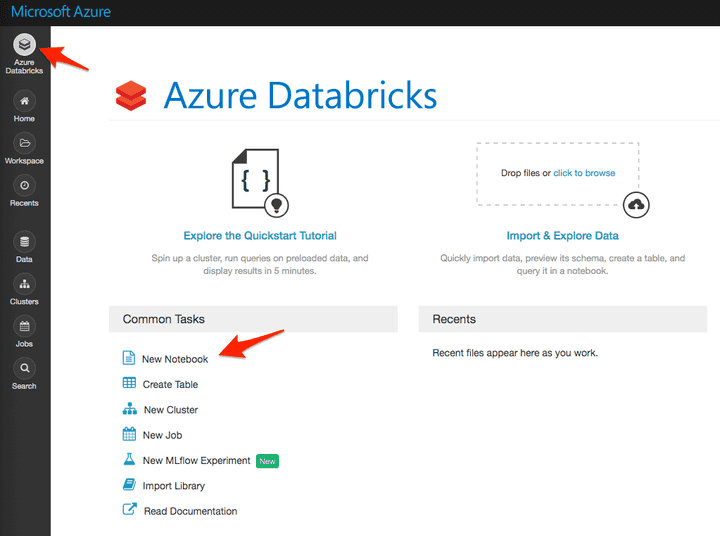
- From the home page:
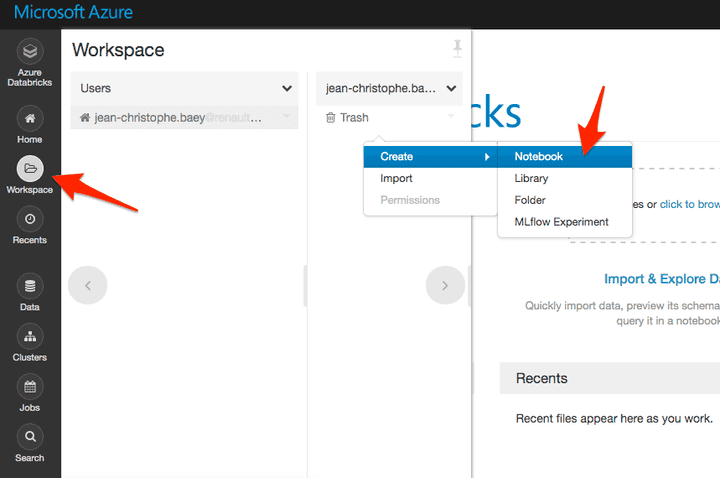
- You can also create a notebook in a specific location:
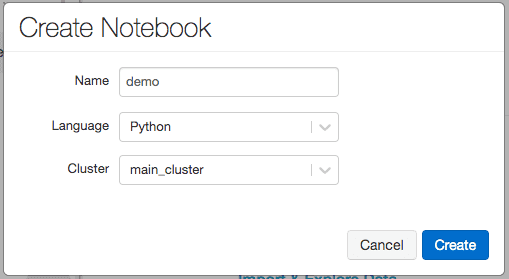
- Then select the notebook default language and the cluster to attach to it:
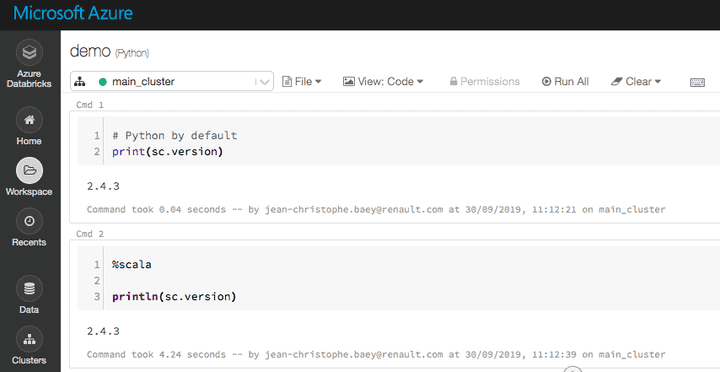
- Once the notebook is created, enter some Python and Scala code. For Scala, you need to add %scala at the first line since the default language we choose is Python:
- To execute the code, you can use the shortcut CTRL+ENTER or SHIFT+ENTER. If the cluster is not running, a prompt will ask you to confirm its startup.
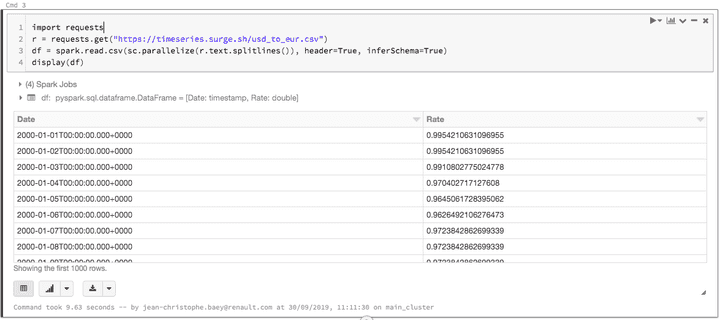
We are now ready for the next step: the data ingestion. However, we need some input data to deal with. We will set up the credentials to be able to load Azure data inside our spark cluster. If you don’t want to use an Azure blob storage, you can skip the Azure storage setup part and get the CSV content directly from the URL with the following code:
import requests
r = requests.get("https://timeseries.surge.sh/usd_to_eur.csv")
df = spark.read.csv(sc.parallelize(r.text.splitlines()), header=True, inferSchema=True)
display(df)
Setup your Azure Storage account
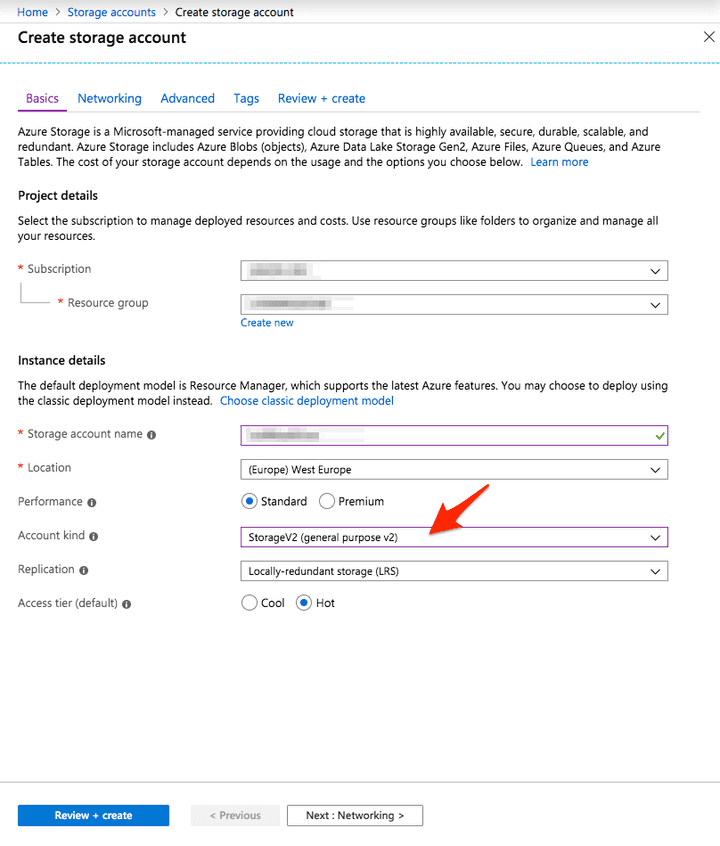
You may already have a storage account. If you already have one, pay attention of the storage type as the way we access the data will be different.
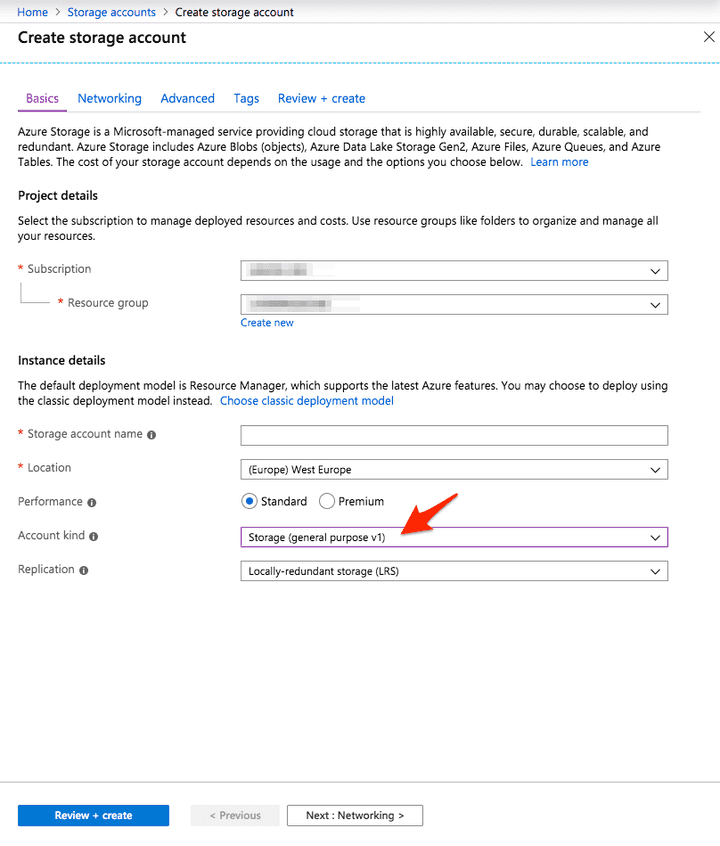
- General purpose v1
- ADLS gen2
Case 1: Storage (general purpose v1)
- To create a new storage, on the Azure portal:
- Create a blob storage container, for instance
databricks-test - Get the file from https://timeseries.surge.sh/usd_to_eur.csv and store it in a container in the Azure blob storage.
Then, get the three parameters from your storage, they will be required to access the data from Databricks:
- The account name
- The access key
- The blob container name
As a good practice, instead of writing down the access key directly in the notebook, we will use an Azure Key Vault to store and retrieve the key.
- From the Azure portal, create a Key Vault named
MY_KEY_VAULT - Inside the created key vault, add a new secret
MY_STORAGE_ACCESS_KEYin which you copy your storage account access key.
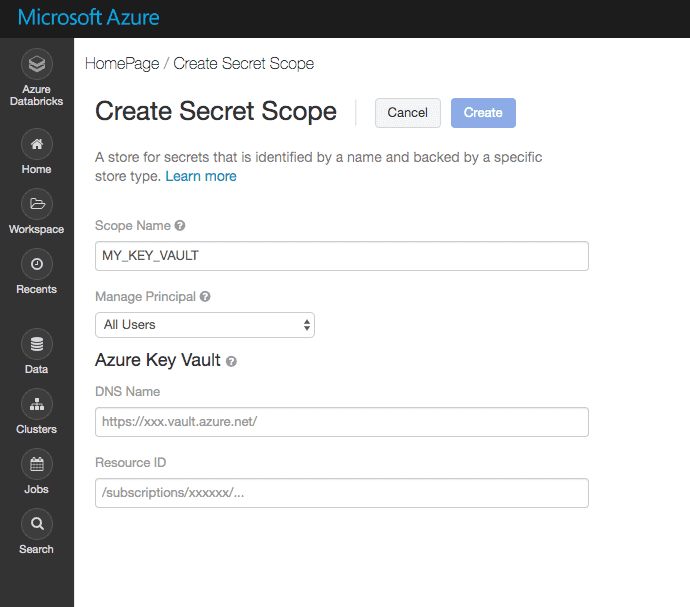
To access the key vault from a Databricks notebooks, you need to create an Azure Key Vault-backed secret scope in Databricks:
- Open the following URL:
https://<your_azure_databricks_url>#secrets/createScope
(for example, https://westus.azuredatabricks.net#secrets/createScope).
-
Give a scope name, my recommendation is to use the key vault name:
MY_KEY_VAULT -
For the fields
DNS NameandResource ID, open the Azure Key Vault from the Azure portal, from thepropertiestab, copy/paste the values. -
Hit the create button.
If it succeeds, you will be able to query the key vault directly from the notebooks:
accessKey = dbutils.secrets.get(scope = "MY_KEY_VAULT", key = "MY_STORAGE_ACCESS_KEY")Further details from the Databricks documentation here.
There are three ways to get data from an Azure storage (general purpose) from PySpark:
-
- Using a WASB file path formatted like this:
wasbs://<containername>@<accountname>.blob.core.windows.net/<partialPath>
- WASB (Windows Azure Storage Blob) is an extension built on top of the HDFS APIs. HDFS, the Hadoop Distributed File System, is one of the core Hadoop components that manages data and storage on multiple nodes.
- Using a mount point on worker nodes with Databricks FS protocol and request files using a file path like:
dbfs:/mnt/<containername>/<partialPath>-
- Using a mount point and request files using a regular file path:
/dbfs/mnt/<containername>/<partialPath>If you are using PySpark functions, you should use 1) or 2). If you are using regular Python IO API, you should use 3).
To set up the file access, you need to do this:
container = "container_name"
storageAccount = "my_storage_account"
accessKey = dbutils.secrets.get(scope = "MY_KEY_VAULT", key = "MY_STORAGE_ACCESS_KEY")

accountKey = "fs.azure.account.key.{}.blob.core.windows.net".format(storageAccount)

# Set the credentials to Spark configuration
spark.conf.set(
  accountKey,
  accessKey)

# Set the access key also in SparkContext to be able to access blob in RDD
# Hadoop configuration options set using spark.conf.set(...) are not accessible via SparkContext..
# This means that while they are visible to the DataFrame and Dataset API, they are not visible to the RDD API.

spark._jsc.hadoopConfiguration().set(
  accountKey,
  accessKey)

# Mount the drive for native python
inputSource = "wasbs://{}@{}.blob.core.windows.net".format(container, storageAccount)
mountPoint = "/mnt/" + container
extraConfig = {accountKey: accessKey}

print("Mounting: {}".format(mountPoint))

try:
  dbutils.fs.mount(
    source = inputSource,
    mount_point = str(mountPoint),
    extra_configs = extraConfig
  )
  print("=> Succeeded")
except Exception as e:
  if "Directory already mounted" in str(e):
    print("=> Directory {} already mounted".format(mountPoint))
  else:
    raise(e)
Notice that we are using dbutils, a Databricks library already imported. dbutils.fs provides files relative function that cannot be used in parallel tasks.
dbutils.fs.ls(".")You can get some help on dbutils using
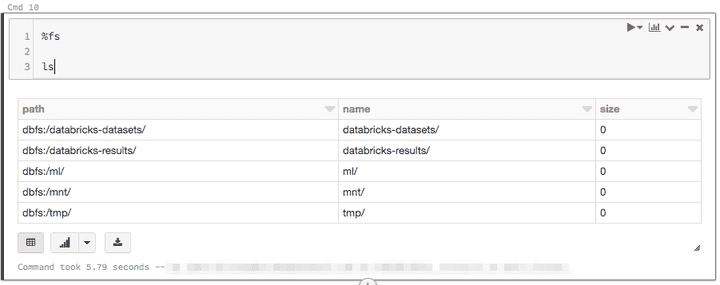
dbutils.help()You can also call directly filesystem function of dbutils using %fs prefix:
Disclaimer: If you share your cluster with other users, choose the storage connection option carefully as all users may have access to the spark configuration, your mount points and then access to the same data.
Case 2: ADSL Gen& and 2 (Azure Data Lake Storage Gen2)
- There is a second type of storage engine that is recommended for Big Data analysis: the ADSL Gen2.
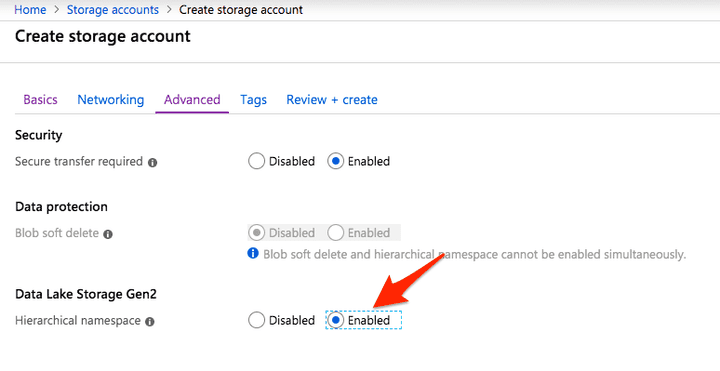
- To create an ADSL Gen2 storage account:
- Enable the Data Lake Storage Gen2: ACL at file level is used, which mean that the low level blob access is removed.
-
In the storage account > Create a File systems, for instance
databricks-test -
You can get access to the files using the storage account access key and the abfss protocol. However, the Gen2 provides some more secured options: you can use the access rights of the notebook user thanks to the Azure Data Lake Storage credential passthrough option on the cluster.
-
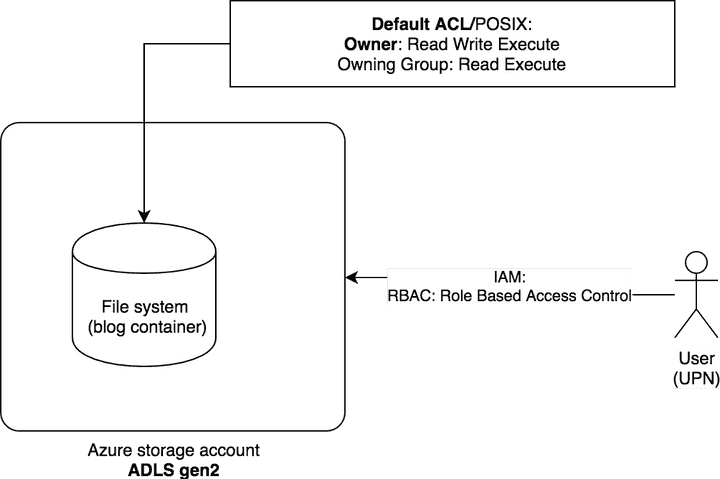
Before going further, you have to make sure the user that runs the cluster has the access rights to the data. Use IAM on the storage account to set a RBAC role (Role Based Access Control) that provides not only the storage account management rights but also provide access to the blob or queue data within that account, basically, one of them:
- Storage Blob Data Owner: Use to set ownership and manage POSIX access control for Azure Data Lake Storage Gen2.
- Storage Blob Data Contributor: Use to grant read/write/delete permissions to Blob storage resources.
- Storage Blob Data Reader: Use to grant read-only permissions to Blob storage resources.
-
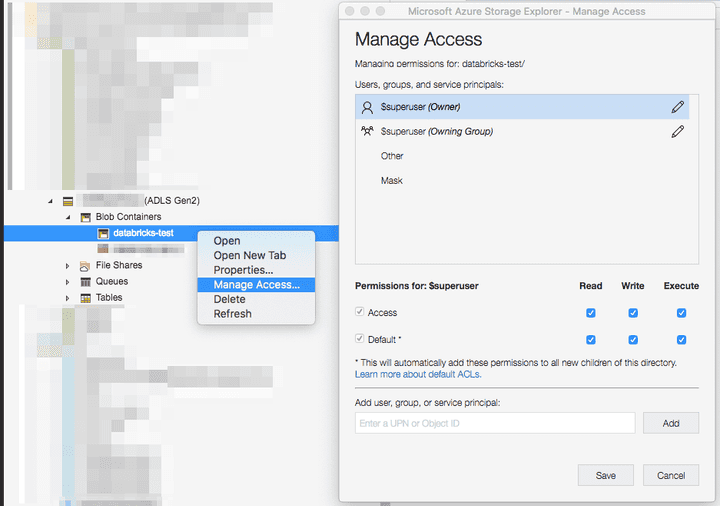
If you do not want to set a RBAC role, you can also fine tune the ACL on the file system directly using the Azure Storage Explorer or AZ CLI:
- You need to enable the option on the cluster, for that, a Premium databricks account is needed.
Then to access a file, the ABFS driver is requested (Azure Blob Filesystem driver, the access pattern is
abfss://<my-file-system-name>@<my-storage-account-name>.dfs.core.windows.net/<partialPath>Instead of using the credential passthrough, you can use a SPN (Service Principal Name = technical account) > give him *Storage Blob Data Contributor rights on the storage account > store the SPN secret into a key vault backed on a Databricks secret scope and finally access to the storage thanks to OAuth 2 mechanism right in the notebook cell. Further details here.
Loading data
Let’s try to put a JSON file in our Azure container and then load it in a Spark Dataframe to make sure everything is working properly.
For our example, we will get the exchange rate file EURO/USD since 2000 in CSV format:
Date, Rate
2000–01–01,0.9954210631096955
2000–01–02,0.9954210631096955- Get the file from https://timeseries.surge.sh/usd_to_eur.csv and store it in the blob container (Gen1) or in the file system (Gen2). You can use Azure Storage Explorer to upload your file.
Then we load the file into a Spark dataframe either using wasbs or dbfs:
- Using wasbs (for storage gen1):
inputFilePath = "wasbs://{}@{}.blob.core.windows.net/{}".format(container, storageAccount, "/usd_to_eur.csv")
df = spark.read.format("csv").load(inputFilePath, header=True, inferSchema=True)
display(df)- Using the mount point (for storage gen1):
inputFilePath = "dbfs:/mnt/{}/{}".format(container, "usd_to_eur.csv")
df = spark.read.format("csv").load(inputFilePath, header=True, inferSchema=True)
display(df)- Using abfss (for Adls storage gen2):
inputFilePath = "abfss://{}@{}.dfs.core.windows.net/{}".format(fileSystem, storageAccount, "usd_to_eur.csv")
df = spark.read.csv(inputFilePath, header=True, inferSchema=True)
display(df)
Basic statistics
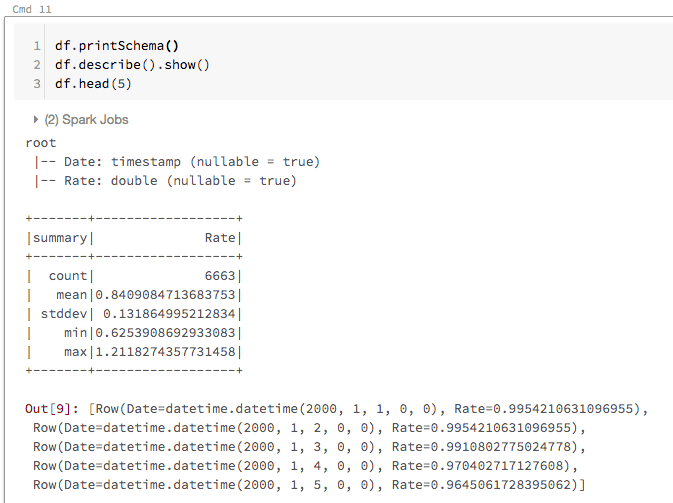
- From our dataframe, let’s do some basic statistics on the DF:
df.printSchema()
df.describe().show()
df.head(5)- We can register the input dataframe as a temporary view named xrate in the SQL context thanks to this command:
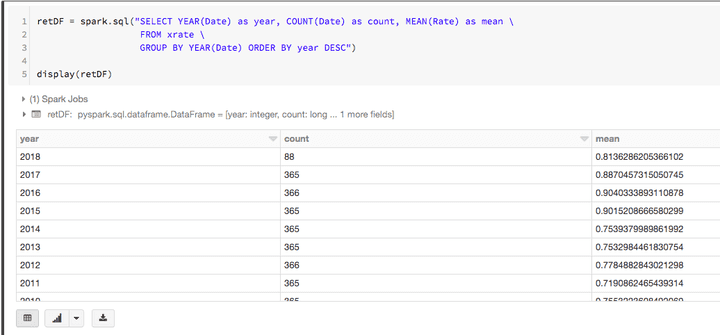
df.createOrReplaceTempView("xrate");- Then we can run SQL queries and get the data from xrate view:
retDF = spark.sql("SELECT YEAR(Date) as year, COUNT(Date) as count, MEAN(Rate) as mean \
                   FROM xrate \
                   GROUP BY YEAR(Date) ORDER BY year DESC")

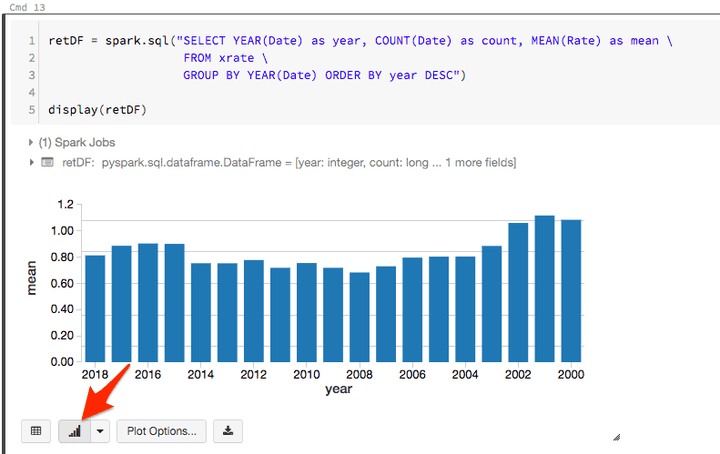
display(retDF)- Notice that the display function can do more than displaying a table with some basic chart features:
- Likewise, we can query the SQL directly in the cell thanks to %sql prefix:
%sql

SELECT YEAR(Date) as year, COUNT(Date) as count, MEAN(Rate) as mean
FROM xrate
GROUP BY YEAR(Date) ORDER BY year DESC- Finally, instead of defining the query with a string, we can use the PySpark API:
import pyspark.sql.functions as f

retDF = (
  df
  .groupBy(f.year("Date").alias("year"))
  .agg(f.count("Date").alias("count"), f.mean("Rate").alias("mean"))
  .sort(f.desc("year"))
)

display(retDF.head(4))- If you want to switch back to Scala, you can use the SQLContext to exchange a dataframe within a %scala cell:
%scala

import org.apache.spark.sql.functions._
var df = spark.table("xrate")
// or
// df = spark.sql("select * from xrate")
var Row(minValue, maxValue) = df.select(min("Rate"), max("Rate")).head

println(s"Min: ${minValue}, Max: ${maxValue}")
We finish the first part of our hands-on post. Your next step is to practice the PySpark API and think in data frames.
Part 2
👉 Don't forget to follow me on Twitter to be notified when new posts are available!
Follow @jcbaey